by Mark of CarPhotoTutorials.com
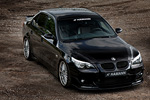
In this article I will take a look behind the scenes of a professional car photo shoot, one that I recently had the possibility to attend during a model shoot actually, now the model might not be interesting (however …) but the cars that were gathered were really nice, for one the white BMW 5-Series Fat Boy and a black BMW 5-Series with full Hamann Motorsport bodykit.
The first one being a white car while the Hamann car was a black one, not the easiest shades to photograph (there is no fun in shooting a red car now is there ?) so I will show you just how to take a decent shot in the first place and make it an outstanding masterpiece ready for publishing in post processing.
STEP 1 : setting up the shootYour first order of business is naturally to plan the shoot, you have to get in touch with the owner of the car (or owners in this case) and decide on a date, time and place you will encounter each other, note that this doesn’t necessarily need to be the spot for your shoot, most of the time a parking lot that is easily found would be best.
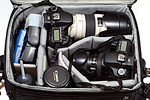 Once you’ve made an appointment it is time to decide on the equipment you are taking to the shoot, for starters make sure you charge all your batteries the day before the shoot, also check the memory cards you intend to use, format them inside the camera to make sure you can take as many shots as possible (after you’ve copied the photos that are still on them onto your computer naturally).
I usually take two camera bodies with me, one with a wide angle on it and the other one with the Canon EF70-200 f/2.8 IS USM for those shots where you have the space available … why such a telephoto zoom lens you might ask ? I will get into that later on.
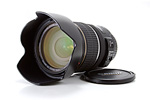 As a wide lens I usually put the Canon EF-S17-55 f/2.8 IS USM on my Canon EOS40D, but I also pack the EF-S10-22 f/3.5-4.5 USM and the EF24-105 f/4.5 IS USM lens in the bag, just in case. Don’t forget your circular polarizing filter, a cloth (just in case) and a remote shutter control for those longer exposures.
Also think about your tripod, you might not need it, but remember that every professional car photographer will use a good tripod for the static shots, it is indispensable in fact, so take it along anyway. I also pack all my external flash units compete with radio triggers, stands and umbrellas, just in case I need some extra light to bring out the details in a shot, again you might not need these, but if you do and you’ve left them at home you’re in trouble.
STEP 2 : the shoot itselfIt is really important to take your time for an automotive photo shoot, if you rush things it will show in the photographs, Rome wasn’t built in a day, and your award winning shot will most likely not be taking without decent preparation either, so make sure both you and the owner of the car have time to spend.
 First decide on a location for your shoot, indoors or outdoors, it all depends on the end result you are trying to achieve, personally I would tend to take as many shots as possible outside, if weather permits, but sometimes you are forced to work indoors, and in this case those flash units will come in handy.
Flash photography on cars is a totally different technique that I will unveil in a future tutorial, so for now I will focus on the outdoor shots, make sure you’ve taken a look at my 10 tips for your first outdoor car shoot tutorial for the basics on a car shoot in daylight.
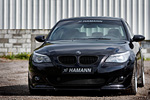
When you are looking around for a location make sure it suits the car, this black Hamann tuned BMW 5-Series was just perfect on a gravel pit with some industrial siding behind it, the black nicely contrasts with the light shaded background, take this into account to make the car ‘visible’ on the background, a dark background with a black car would be a difficult shot.
STEP 3 : photographing the car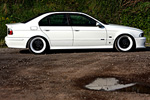 Once you’ve decided on a place and a time (preferably in the late afternoon on a sunny, but cloudy day) it is time to start photographing that stunning looking car in front of you, so you start thinking about which angles you would like to have in your shots, this is where your relationship with the owner comes in handy.
He will have to move his car around several times during the shoot, so the better your relationship with him (or her) the better you will get away with asking him to move the car just a few inches more to get the shot you want, as it is better to move the vehicle than to take another angle in some cases.
Because you will be keeping an eye on the position of the sun (preferably on your back, remember ?) the car will have to be positioned just right so there are no harsh shadows visible when you take that award winning photograph.
STEP 4 : the anglesA lot has been said about which angles you just have to take when photographing a car, and I will repeat myself again in this section. These are the most important angles you just have to take during a professional car photo shoot : Front three-quarter shot from headlight level, Rear three quarter shot from taillight level, Full frontal and full rear view, Full side view from a low level and if possible a front and rear three quarter view from a higher level.
 This latter shot might require you to bring a ladder, fortunately the location I selected for this photo shoot had some other options, I could go up a slope on one side while large containers were parked on the other side, with a ladder on the side to get on top of them. Always keep in mind that you might not be allowed to climb on top of a container, so a nice stepladder might be a great idea to add to your equipment list.
Normally I also include some interior shots in my shoot, these require some very different settings, and most of the time extra light equipment, so I won’t go into details in this article, a full tutorial on ‘car interior photography’ will be available next….
Read more Behind the Scenes
No comments:
Post a Comment